
Post by goten0040 on Oct 22, 2006 1:47:22 GMT -5
Hello! Goten here, ready to share with you my mad AMV skillz.  I hope I can answer some of your questions in this detailed tutorial. BTW, the images are large, but helpful, so I apologize for their size.
---
To begin, you have to get the video clips and audio clips ON YOUR HARDDRIVE. You can do this by either loading and decrypting the DVD (if you have the DVD's, you can PM me on how to decrypt), or by downloading the clips off the internet (and NO, I don't know the good sites for clips, except maybe BitTorrent.) A good suggestion to where to find songs would probably be Singingfish.com. That's where I get most of mine, if not off CDs.
Now, let's get to the program. I'm using Chobits clips because I'm severely lacking on Avatar clips, and have an abundance of these. Hopefully my directions are easy to understand. I don't make many tutorials. >>;
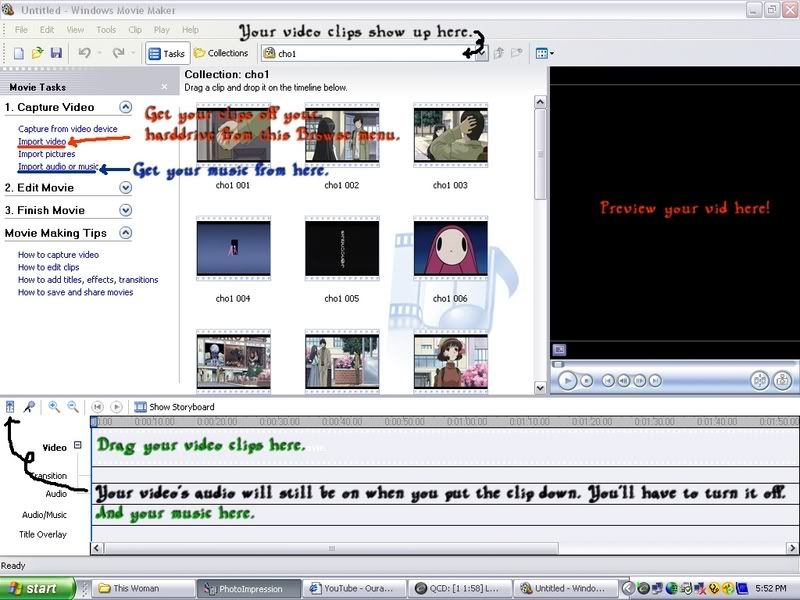
Alright, most of this picture says it all, but I'll clear it up a bit. To get your video clips, once they're on your harddrive, you have to click "Import Video." You will then see a Browse menu. You'll have to search your harddrive for your clip. I'd suggest putting it in a folder where you can find it. Double click and wait for the clip to load. Then the clips will appear in the large box in the middle. You do the same with the audio. Sometimes the audio clip will appear in "Collections." You can get there by opening the drop-down menu. This is also how you access your other clips.
Then you just drag your video clips and audio clips down to the video timeline. I've labeled where.
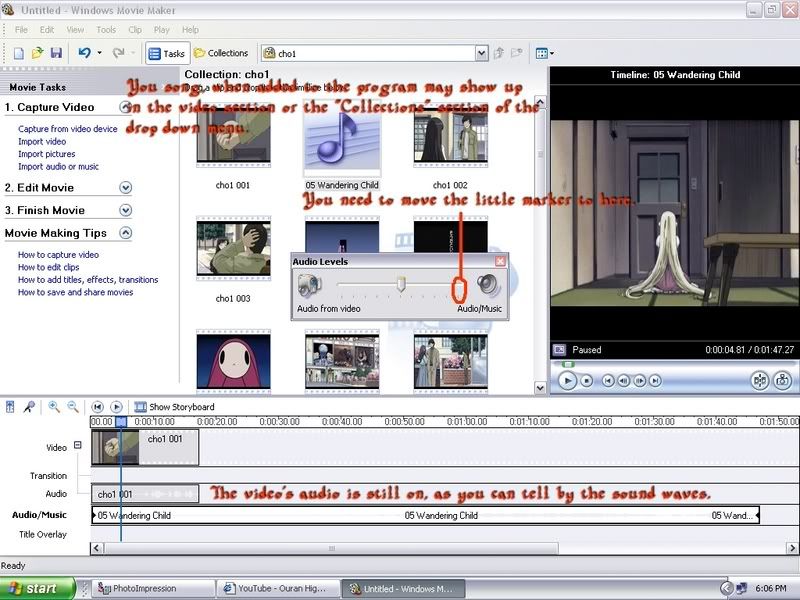
Next, you have to turn off your video audio so it won't interfere in your song. The easy way to do this is to change the Audio Levels from the midpoint over to Audio/Music. The hard way is to go through every clip, right-clicking and muting. You can use this technique if you'd like some clips to have voice for effectm but it's a pain in the butt, so make sure you WANT to do that.
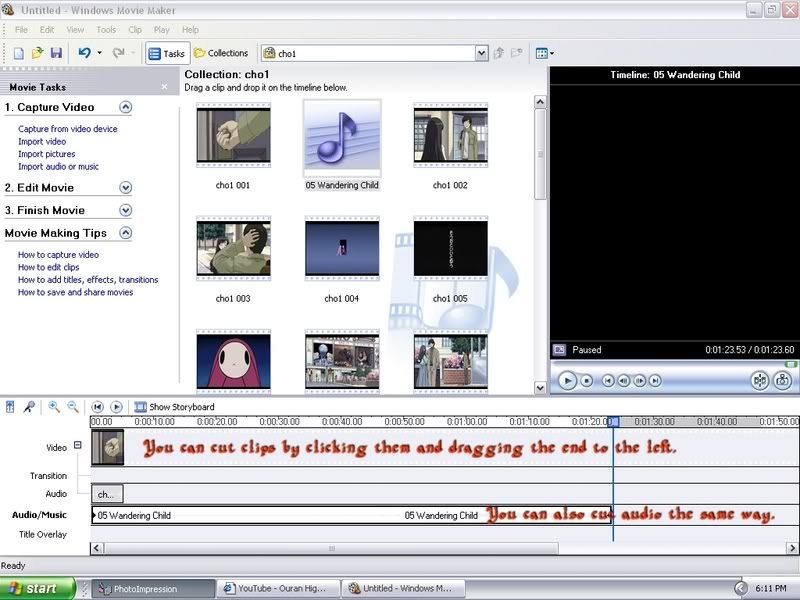
Cutting clips is pretty simple. All you have to do is click on the clip, drag it to the left. You drag it the other way to extend it, but it will only go to the end of the clip. If you want to add length the the video clip, you can try slowing it down, but too much will make it move choppy and screw up the animation. You can cut audio too in the same way, but not many do it because it cuts off the song abruptly.

Moving on to effects. This is what makes the video a lot of the time, but, take it from me KEEP IT SIMPLE!!!!!!!!!!!!!! Too many effects can ruin a video and make it amateurish, so keep that in mind. Just a few effects can spice it up. To get the "Effects" box, you right click on the clip you want to add an effect too and click "Video Effects." You can then do whatever you like to the clip in various ways. I would suggest newbies to play around with them and see what happens. I have a few clips with different effects in my Sample Video at the end of this thread.
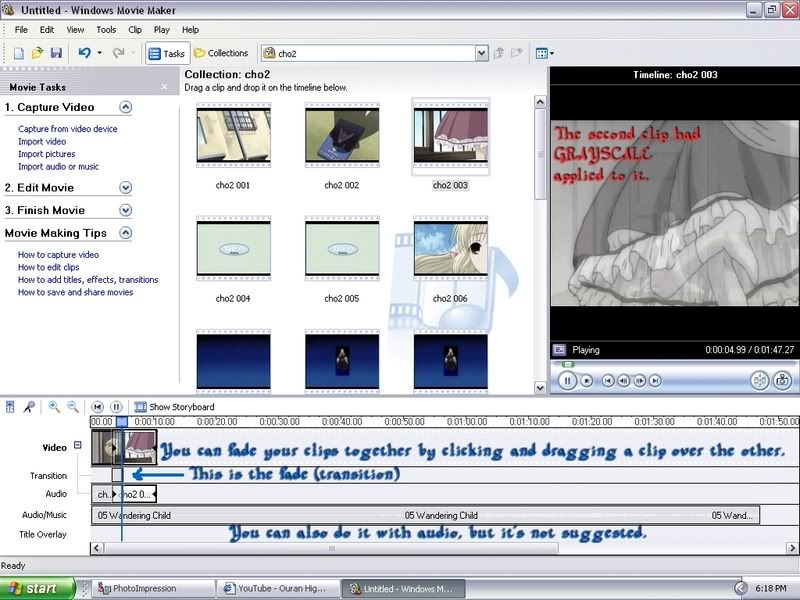
Fading is important in videos, especially those with a softer touch. Just click the clip and drag it over the other one as far as you want. Most clips don't fade all the way in, however, without going to the other side, so be careful. To make a more precise fade, zoom in on the timeline and start fading. You can fade audio together, but it usually sounds a jumbled mess. Try to stay away from that.
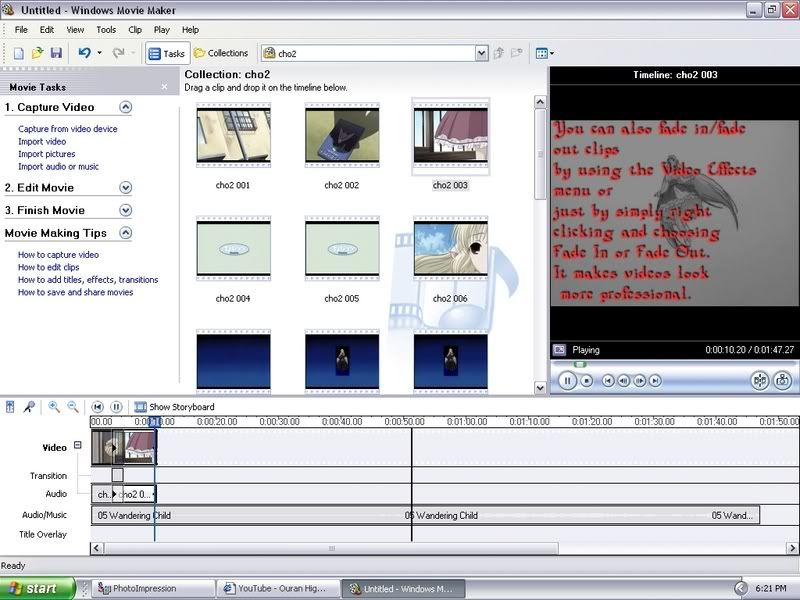
Fading in and fading out is VERY IMPORTANT! It tends to be ignored in music videos, but it is SO very important. It makes things much more professional. Simply right-click the clip you want to fade in/out and choose that very choice, "Fade In" or "Fade Out". You can also do this from the "Effects" Box. In fact, if you'd rather fade in/out to white, the "Effects" Box is the only way to do it.
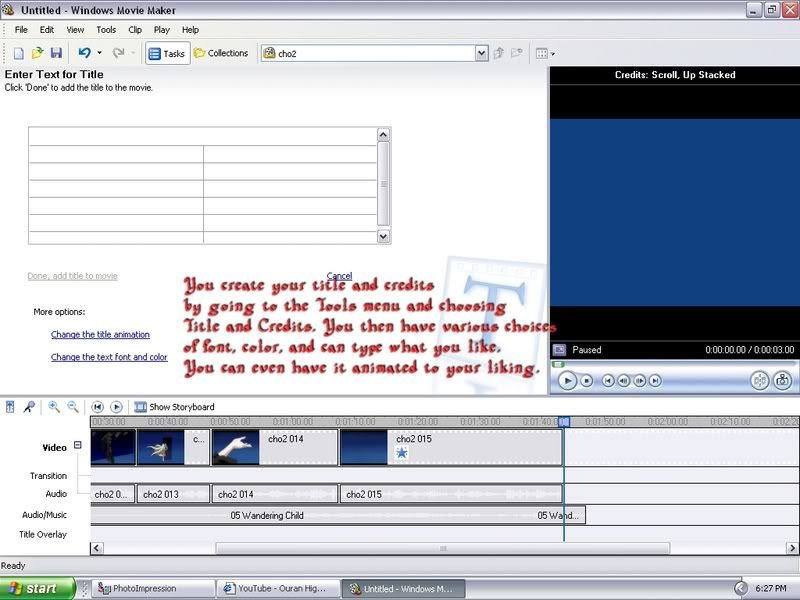
When you're done adding all your video clips, you can add titles and credits. You go up to the top drop-down menu labeled "Tools" and choose "Title and Credits." It will then change the "Collections" Menu and "Tasks" box into one large option box. I tend to put all my credits at the end to avoid screwing up any clips, but you can add a title at the beginning too. If you DO however, do it BEFORE you add any video clips.
From there, you can choose what kind of credits you want. You can use different animation techniques, fonts, colors, all that. (PM me if you want some good font places. I know a few.) When done, just click "Done, Add Title to Movie."
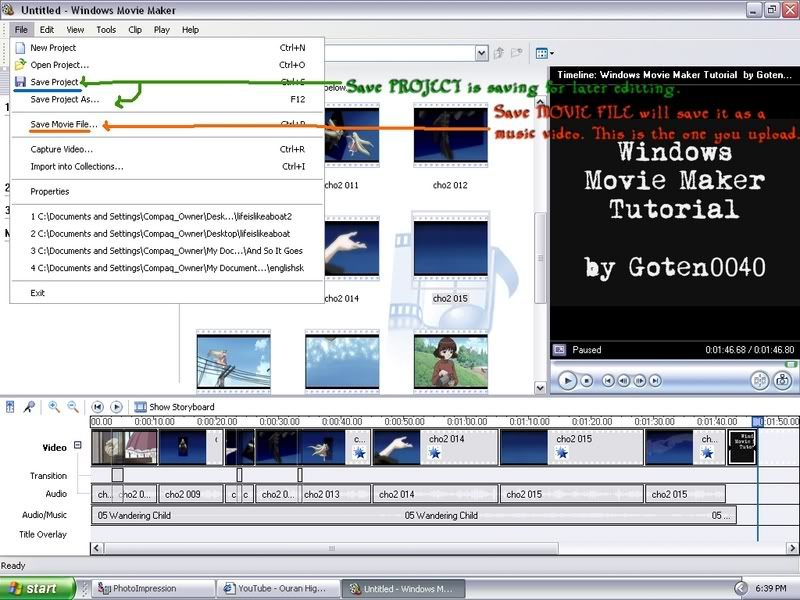
Now, on to saving your project. Remember SAVE EARLY AND OFTEN!!!!!!! Windows Movie Maker isn't the most RELIABLE program in the world, so click "Save Project As" before doing ANYTHING. Then save every one or two clips. The program tends to freeze up on you.
Saving your video, however, is different. Click "Save Movie File." You MUST save your video as a Movie file before uploading it. Otherwise it won't work.

When you are saving your movie file, you will go through a process of menus. The most important would have to be the quality of your video. My suggestion is "High Quality Video (small)," rather than the reccomended. It makes it much easier to upload and doesn't take up your harddrive, but doesn't ruin your clips. It's your choice however. I'm one with slow internet, so, you know.
---
So that's about it. It's really quite simple when you look at it right.
Here's the finished product.
Questions? Comments? Put them here or PM me! I'm always here to help.
 I hope I can answer some of your questions in this detailed tutorial. BTW, the images are large, but helpful, so I apologize for their size.
---
To begin, you have to get the video clips and audio clips ON YOUR HARDDRIVE. You can do this by either loading and decrypting the DVD (if you have the DVD's, you can PM me on how to decrypt), or by downloading the clips off the internet (and NO, I don't know the good sites for clips, except maybe BitTorrent.) A good suggestion to where to find songs would probably be Singingfish.com. That's where I get most of mine, if not off CDs.
Now, let's get to the program. I'm using Chobits clips because I'm severely lacking on Avatar clips, and have an abundance of these. Hopefully my directions are easy to understand. I don't make many tutorials. >>;
Alright, most of this picture says it all, but I'll clear it up a bit. To get your video clips, once they're on your harddrive, you have to click "Import Video." You will then see a Browse menu. You'll have to search your harddrive for your clip. I'd suggest putting it in a folder where you can find it. Double click and wait for the clip to load. Then the clips will appear in the large box in the middle. You do the same with the audio. Sometimes the audio clip will appear in "Collections." You can get there by opening the drop-down menu. This is also how you access your other clips.
Then you just drag your video clips and audio clips down to the video timeline. I've labeled where.
Next, you have to turn off your video audio so it won't interfere in your song. The easy way to do this is to change the Audio Levels from the midpoint over to Audio/Music. The hard way is to go through every clip, right-clicking and muting. You can use this technique if you'd like some clips to have voice for effectm but it's a pain in the butt, so make sure you WANT to do that.
Cutting clips is pretty simple. All you have to do is click on the clip, drag it to the left. You drag it the other way to extend it, but it will only go to the end of the clip. If you want to add length the the video clip, you can try slowing it down, but too much will make it move choppy and screw up the animation. You can cut audio too in the same way, but not many do it because it cuts off the song abruptly.
Moving on to effects. This is what makes the video a lot of the time, but, take it from me KEEP IT SIMPLE!!!!!!!!!!!!!! Too many effects can ruin a video and make it amateurish, so keep that in mind. Just a few effects can spice it up. To get the "Effects" box, you right click on the clip you want to add an effect too and click "Video Effects." You can then do whatever you like to the clip in various ways. I would suggest newbies to play around with them and see what happens. I have a few clips with different effects in my Sample Video at the end of this thread.
Fading is important in videos, especially those with a softer touch. Just click the clip and drag it over the other one as far as you want. Most clips don't fade all the way in, however, without going to the other side, so be careful. To make a more precise fade, zoom in on the timeline and start fading. You can fade audio together, but it usually sounds a jumbled mess. Try to stay away from that.
Fading in and fading out is VERY IMPORTANT! It tends to be ignored in music videos, but it is SO very important. It makes things much more professional. Simply right-click the clip you want to fade in/out and choose that very choice, "Fade In" or "Fade Out". You can also do this from the "Effects" Box. In fact, if you'd rather fade in/out to white, the "Effects" Box is the only way to do it.
When you're done adding all your video clips, you can add titles and credits. You go up to the top drop-down menu labeled "Tools" and choose "Title and Credits." It will then change the "Collections" Menu and "Tasks" box into one large option box. I tend to put all my credits at the end to avoid screwing up any clips, but you can add a title at the beginning too. If you DO however, do it BEFORE you add any video clips.
From there, you can choose what kind of credits you want. You can use different animation techniques, fonts, colors, all that. (PM me if you want some good font places. I know a few.) When done, just click "Done, Add Title to Movie."
Now, on to saving your project. Remember SAVE EARLY AND OFTEN!!!!!!! Windows Movie Maker isn't the most RELIABLE program in the world, so click "Save Project As" before doing ANYTHING. Then save every one or two clips. The program tends to freeze up on you.
Saving your video, however, is different. Click "Save Movie File." You MUST save your video as a Movie file before uploading it. Otherwise it won't work.
When you are saving your movie file, you will go through a process of menus. The most important would have to be the quality of your video. My suggestion is "High Quality Video (small)," rather than the reccomended. It makes it much easier to upload and doesn't take up your harddrive, but doesn't ruin your clips. It's your choice however. I'm one with slow internet, so, you know.
---
So that's about it. It's really quite simple when you look at it right.
Here's the finished product.
Questions? Comments? Put them here or PM me! I'm always here to help.