Post by splendoris on Sept 24, 2006 22:12:00 GMT -5
These tutorials were both requested. I didn't save either icon as a .psd, so I had to totally recreate both of them from memory, so they may be a little bit off, but I tried to get them as close as possible to the original. Both of these are made for moderate beginners who at least have some knowledge of how to use their program. Made in Photoshop CS, but should be easily translatable to anyone who knows their program.
Tutorial 01
01. Started with this image, (you can use your own if you want):
firebender.com/e12/images/fb0061.jpg
02. Cropped to this:

03. Duplicate the original layer.
04. Make sure the duplicate layer is selected, and go to Filter >> Blur >> Gaussain Blur... A window should pop up. Set your radius to 1.3 pixels and click OK. Should look like this:

05. Duplicate layer still selected. Set the layer mode to screen and change the opacity to 86% to both brighten and slightly blur the original image.

06. Take this texture:

Paste it on top as a new layer. Set the layer to Screen, 100%.

07. Duplicate your original layer, and bring it to the top. Desaturate it by going to Image >> Adjustments >> Desatuate. Set the layer mode to Soft Light, 100%

You can see this made the image more visible. If you'd like, you can repeat step 07 to achieve an even darker effect if that's just too much texture for you.
08. Add text/brushes as you see fit. For mine, I used this brush: and deleted the text. Then I added my own tiny text, and wrote FREEDOM FIGHTERS in size 10, Georgia, letter spacing 25
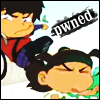
The tutorial makes this icon:
This was the original icon:
Pretty close, I think ^^ And it was pretty simple to make, now wasn't it?
----------------------------------------------
Tutorial 02
01. Original image:
firebender.com/e14/images/fb0186.jpg
02. Cropped to this:

03. Go to Image >> Adjustments >> Auto Contrast. You should end up with something like this:

04. Duplicate the base image and set the duplicate layer to Soft Light, 100%.

05. Add this texture:

Set it to Screen, 100%.

06. Duplicate the base image, bring it to the top. Desaturate it but going to Image >> Adustments >> Desaturate. Set it to Soft Light, 100%. Then duplicate the desaturated layer. Your layer palette should look like this:

And your icon should look something like this:

07. Add text/brushes as you like. I added some tiny text and the font used is a size 10pt Georgia on Small Caps with spacing around 75.
Tutorial:
Original:
------------------
I hope these were helpful to at least someone, especially the original requester!
Tutorial 01
01. Started with this image, (you can use your own if you want):
firebender.com/e12/images/fb0061.jpg
02. Cropped to this:
03. Duplicate the original layer.
04. Make sure the duplicate layer is selected, and go to Filter >> Blur >> Gaussain Blur... A window should pop up. Set your radius to 1.3 pixels and click OK. Should look like this:
05. Duplicate layer still selected. Set the layer mode to screen and change the opacity to 86% to both brighten and slightly blur the original image.
06. Take this texture:
Paste it on top as a new layer. Set the layer to Screen, 100%.
07. Duplicate your original layer, and bring it to the top. Desaturate it by going to Image >> Adjustments >> Desatuate. Set the layer mode to Soft Light, 100%
You can see this made the image more visible. If you'd like, you can repeat step 07 to achieve an even darker effect if that's just too much texture for you.
08. Add text/brushes as you see fit. For mine, I used this brush:
and deleted the text. Then I added my own tiny text, and wrote FREEDOM FIGHTERS in size 10, Georgia, letter spacing 25The tutorial makes this icon:
This was the original icon:
Pretty close, I think ^^ And it was pretty simple to make, now wasn't it?
----------------------------------------------
Tutorial 02
01. Original image:
firebender.com/e14/images/fb0186.jpg
02. Cropped to this:
03. Go to Image >> Adjustments >> Auto Contrast. You should end up with something like this:
04. Duplicate the base image and set the duplicate layer to Soft Light, 100%.
05. Add this texture:
Set it to Screen, 100%.
06. Duplicate the base image, bring it to the top. Desaturate it but going to Image >> Adustments >> Desaturate. Set it to Soft Light, 100%. Then duplicate the desaturated layer. Your layer palette should look like this:
And your icon should look something like this:
07. Add text/brushes as you like. I added some tiny text and the font used is a size 10pt Georgia on Small Caps with spacing around 75.
Tutorial:
Original:
------------------
I hope these were helpful to at least someone, especially the original requester!
 I'll have to try it sometime. Did you make the texture too?
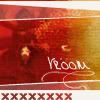


 Thanks.